
Different midi programs can work differently in Pro Tools. Working with midi in what is known as “piano roll” is basically always the same, well give or take. Writing midi information can be as simple or as detailed as you might like it to be, but you might set up for it, and approach the track set ups differently; depending on the midi software itself.
I would like to extend some basic information to those that might need it, on a bunch of midi stuff. I’ll discuss writing and editing midi notes, midi note values, and midi note duration. Keeping in step, I’d like to also supply some information on automating midi, with such parameters as setting note velocity, volumes, and panning.
I will use a couple of different midi software examples in this post in order to perhaps help the widest range of midi music writers. Again, this blog post is for Pro Tools version 6.8.1.
Writing MIDI in Reason.
Let me start with writing midi using the piano roll style of editor found in Reason software. Reason is set up in Pro Tools LE 6.8.1 by opening up a new stereo audio track. Let’s say we are writing a stereo bass line in Reason, using the NN19 module.
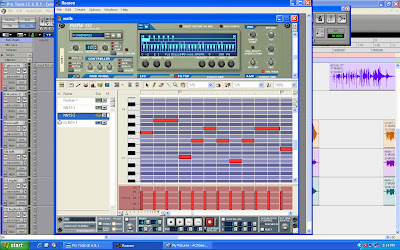
All that one needs to do is write the midi notes into Reasons piano roll.
Reason is so darn easy to work with that I highly recommend it to everyone. Writing and/or removing midi notes in Reasons piano roll is done with the pencil and the eraser tools. Enter the duration value of the note that you wish to write, lets say a quarter note, and then find the note that you need (A through G), and write it using the pencil tool. Switching the note duration value changes the grid in the piano roll to that value, so adding or changing midi notes is easy to “hear” before you write the notes.
The main point here is that the piano roll remains in Reason. Reason, in Pro Tools LE 6.8.1 shows up as an audio track. We do all of our midi writing, editing, automation, ect., in Reason itself. So what about writing and editing midi in Pro Tools? So glad that you asked!
I recently received ToonTracks EZ Drummer 2.0 so I will use this awesome software for the next example. I quickly found out that I needed to open two new tracks in Pro Tools in order to write midi using EZ Drummer 2.0. First, I had to open a stereo audio track, and select EZ Drummer as an active insert.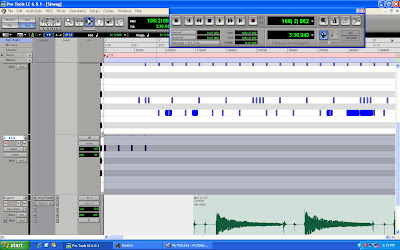
Next I found out that opening up a new midi track was necessary in order to record the midi notes. This is due to the version of Pro Tools that I am currently using. Pro Tools 7.0 and on do not require this midi track, as you can simply drag and drop the midi straight into the stereo audio track. Make sure to select EZ Drummer as your midi out on the midi track, so the notes that we will put on the midi track will go where they should go. Refer to the image above to see this.
Once I opened up the EZ Drummer software and found the loop that I wished to open, I found that it would not allow me to drag and drop it onto any tracks at all. Oh well, instead of giving up I decided that it was time to try some new methods. I had to select “import midi”, under the “File” tab, and manually find the loop in my computers drive. This proved to slow me down at the beginning, but I soon got pretty good at locating the desired loops.
The midi information will appear on a new midi track, so now you will have two midi tracks. You must now select the midi notes that you want from the loop (if not the whole loop), highlight them and then copy and paste them to where you want them in the first midi track. No problem, right? Once this task is complete you can delete the imported midi track. Next, find another loop and repeat the importing midi process. Again, look at the image above to get a better look at this process.
After putting the loops just where I wanted them, it was time to add some single midi notes. I wanted to add some cymbal crashes and some extra kick and snare hits to my track. Making your midi track larger makes things easier to work with. Click on the mini sized keyboard and select “jumbo”. Next, use the midi zoom buttons to enlarge the midi notes and the piano roll grid spacing. They are located in the upper left hand corner of your Pro Tools interface. Press or click on the top most part increases the size of the individual midi notes.
Adding notes is as simple as drawing them on the grid with the pencil tool. If it is drawn where it should not be, then just use the grabber tool to highlight the note, and move it where it should be. Remember to make sure that you have the correct movement type in the grid set up. Having the edit mode set to “grid” will move the note to the next note value. Having the edit mode set to “spot” allows you to type in the exact placement of the notes beginning in means of bars and beats.
If you click on the track view button (below the midi tracks title) you will be able to select between “blocks, regions, notes, velocity, pan” and on and on. Choosing velocity allows you to raise or lower the notes velocity using the pencil tool. Simply highlight the note in which you desire to alter with the grabber tool, and raise it or lower it using the pencil tool. You use this same procedure to change a notes panning, volume, or whatever you desire to alter.
No comments:
Post a Comment