
I am constantly looking at what people are actually searching for as they stumble across the Home Recording Weekly blog. Today's topic is from a recent search on the topic of how to create effect loops in Pro Tools 8. I have quickly wrote about this very thing in the past, but I have not gone into any great depth on this awesome topic. So, lets do this!
In order to supply you all with some images, I chose to create my own quick and simple effects loop. To start I opened up a new session in Pro Tools 8. Next, I created three tracks, but all of a different type.
The three tracks that I created are a stereo audio track, a midi track, and a stereo auxiliary (aux) track.
The audio track is for your sound source. If you are recording a guitar, a bass, or a microphone signal like vocals, then you will need an “audio track”. For this example, though, I am putting Toontrack EZ Drummer 2.0 on my audio track. I will be adding a room reverb to the drums, via an effects loop.
The reason why I created a midi track is that I need to place to place the midi information, where it can be edited to precision, and then trigger the Toontrack EZ Drummer 2.0 to sound. There is a new track type in Pro Tools 8 called an instrument track, which is a combined midi/audio track, but I am not yet in the habit of using them.
The auxiliary track that I have created will be for placing an effect onto. I will be adding a nice room reverb to the drum track in order to give it a nice “overhead” microphone sound. Toontrack EZ Drummer 2.0 has a mixer section included just for adding an overhead microphone, but I want to do a tutorial today, so I will be doing it this way.
When thinking about effect loops, the main point to think about is that the drums will not be 100 percent effected by the reverb, or “wet”. I will not be taking the outputs from the drums and running them directly into the reverb, and then to a stereo track. I, instead, only wish to effect a percentage of the drum signal. Hence the tutorial on “effect loops”.
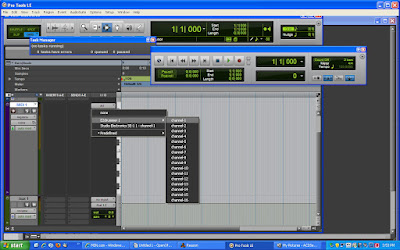
Below is image number one. It shows the audio track on top, and Toontrack EZ Drummer 2.0 as the insert on the track.

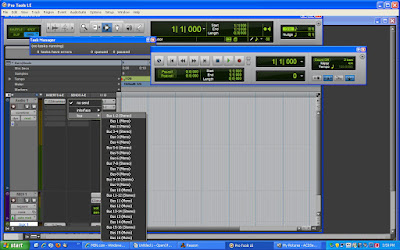
The second image is below this paragraph, and it is of the midi track. Notice that I have changed the tracks output to the correct output for the track, or as Toontrack EZ Drummer 2.0; channel one.
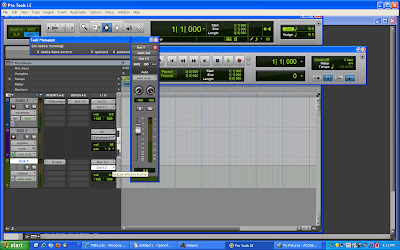
The image below shows the room reverb being selected and added on to the auxiliary track. You must put the wanted effect on to an auxiliary track, but we are not done yet. We still need to assign some audio signal into the reverb, which we will do next.

Next I needed to place a “send” signal from the audio track, to the reverb track. I selected “bus 1 and 2” as the way in which to create my stereo effects loop. This “stereo bus” will take a percentage of our audio from the drum track (audio track) and send it to the reverb (aux) track. We will be able to dial in the exact amount (percentage) of drums that are being sent to the reverb track using the “send” volume (amount) slider.
When we start working the effects into the finished song, we will also be able to dial in the exact amount of the “dry” drum signal, and the “wet” drum signal, as they get finalized. These will be two completely different signal paths that will eventually get laid on to just one stereo track in our finished song.

The image below is of the reverb tracks' output volume slider. I will use this, in conjunction with the “send” amount/volume slider from the audio track, in order to dial in both the amount of signal getting reverb, and also how much “reverbed signal” gets heard and/or recorded. This might sound confusing, but it is not. Think about the two sliders involved here, and just what each one is doing. One is sending drum signal to the reverb, and one is sending reverb (plus drums) to the final stereo mix.
The image below is of the reverb tracks' output volume slider. I will use this, in conjunction with the “send” amount/volume slider from the audio track, in order to dial in both the amount of signal getting reverb, and also how much “reverbed signal” gets heard and/or recorded. This might sound confusing, but it is not. Think about the two sliders involved here, and just what each one is doing. One is sending drum signal to the reverb, and one is sending reverb (plus drums) to the final stereo mix.
It just makes any signal, from vocals to guitars, sound much better if you add your effects by means of effect loops. Adding an “effected” or “wet” signal to a dry signal is by far the best approach. Most of the time we do not want to send 100 percent of a signal into an effect unit/track, and then record its output. The reason is that it sounds 100 percent wet. No clarity from the original audio source will be recoverable, and it just sounds thin and weak.
To take this theory farther, we can also send more than one track to the same effect loop. Think about having six tracks of drums, via drum microphones, and each one going to the exact same effects loop. This type of loop is also known as a “bus effects loop”, and it just makes life easier as you track out a song. Having separate loops for each part of the kit would quickly get confusing, and bus effect loops will save on your computing power by shaving the amount of tracks that you might need to effect as many separate tracks.
Have fun applying your own effect loops to your works of art. Thanks for stopping by the Home Recording Weekly Blog, and please feel free to take one second and subscribe today! Comments are always welcome too! I love to share, so send in any tips that you might have as comments, just so I can post them too! Happy music making!
No comments:
Post a Comment